Updated on March 25, 2024.
Insulin is injected into the layer of fat below the skin—what’s known as “subcutaneous” tissue—where there are no nerve endings. Plus, these days, syringes and pen needles are designed in such a way that most people feel little or no pain at all.
Still, it's natural to feel some anxiety about insulin injections. Here’s what you need to know to handle this aspect of your diabetes management with a minimum of stress.
Choosing an insulin injection device
A syringe is the most common way to give yourself an insulin injection, but it’s not the only one. Many people use insulin pens or pumps.
Like a syringe, a pen delivers insulin through a needle. A pump relies on a catheter, placed under the skin, to deliver insulin. There are advantages and disadvantages to each. Your healthcare provider (HCP) will help you determine which one is best for you.
A member of your healthcare team—whether it’s your doctor, nurse, or certified diabetes care and education specialist—can also explain the steps. If you decide to use a syringe, consider practicing by injecting a saline- or water-filled syringe into an orange or a rolled-up washcloth to help you get a feel for the process.
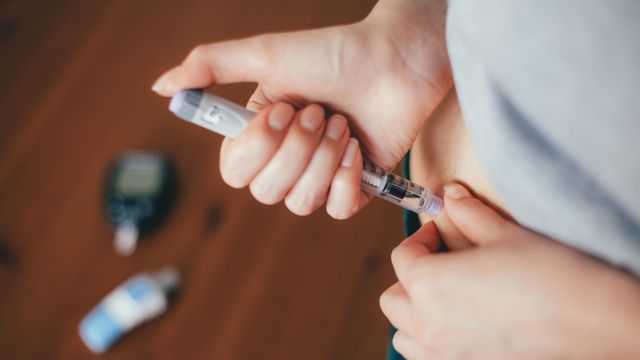
Choosing an injection site
Where you inject insulin makes a difference, since insulin enters the blood at different speeds depending on the location. For example, insulin shots in the abdomen generally work fastest. By comparison, shots given in the back of the upper arms, outer thighs, upper part of the buttocks, or other areas where the body has accumulated fat typically work more slowly. This is because fat can slow down the absorption of insulin. Skin thickness and subcutaneous blood supply—blood supply under the skin—factor into absorption speed, as well.
Using different injection sites for different types of insulin can be helpful. As always, consult with your HCP or diabetes educator on the best method for you.
Since insulin is meant to be delivered into the fat layer just under the skin, it’s important to pick a site that you can see and reach. To help ensure that the insulin reaches your blood at about the same speed each time you give yourself a shot, stick with the same general area of your body—but not the same spot. If you inject in the exact same place each time, hard lumps or extra fatty deposits may develop. These deposits can delay insulin absorption and reduce the amount of insulin available to the body.
Staying within the same area but injecting into different spots is known as “rotating” injection sites. Here’s an example of site rotations if you inject four times a day and all the injections are in your abdomen:
- Imagine the face of an old-fashioned clock on the right or left side of your abdomen.
- Pick a 12 o’clock point to orient yourself.
- Your first injection would be made at the 12 o’clock spot, your second injection at 1 o’clock, the third at 2 o’clock and the fourth at 3 o’clock.
Rotating sites like these means you won’t return to 12 o’clock for three days if you were to use one side of your abdomen, or six days if you were to switch sides. Either decision would give enough time for that spot to recover before you use it again.
A few other tips to remember: Try to stay at least 1 inch between injection sites and if you inject into your abdomen, aim at least a couple inches away from your navel and at least 1 inch or so away from your beltline.
Wherever you choose to inject insulin, you’ll want to avoid moles and scars as well as any areas of your skin with swelling, inflammation, or unusual changes in texture.
How to inject insulin with a needle
After you’ve picked an injection site, make sure the skin is clean—washing with regular soap and water will do—and dry. It’s generally not recommended to use alcohol to clean the area.
Then follow these steps:
- Pinch a 1- to 2-inch portion of skin and fat between your thumb and first finger.
- With your other hand, hold the syringe or pen at a 90-degree angle (perpendicular) to the skin and insert the needle with one quick motion. Make sure the needle is all the way in the pinched portion of the skin.
- Let go of the skin pinch, then inject the insulin. Push the plunger with your thumb at a moderate, steady pace until the insulin is fully injected. If using a syringe, keep the needle in the skin for 5 seconds. Keep it in for 10 seconds if you’re using a pen.
- Remove the needle at the same 90-degree angle. Press the injection site with your finger for 5 to 10 seconds to keep insulin from leaking out.
- If you’re using a pen, remove the needle by replacing the large cover and unscrewing the cap. Leaving the needle on the pen can result in leakage or air bubbles.
Dispose of sharp objects responsibly
It's important to responsibly dispose of sharp objects (called "sharps") including needles, syringes, and lancets (finger stick devices used to test blood sugar levels). Failing to do so puts others at risk, since anyone who comes in contact with them could accidentally get stuck by them.
Place your sharps in a dedicated sharps container or something that is puncture-proof, like an empty laundry detergent jug or fabric softener bottle. Store it out of reach of children and pets until it’s about three-quarters full. Then, close the container tightly with a screw-on cap and dispose of it.
Where, exactly, you throw it away depends on where you live. Different communities have different rules for handling medical waste. Check with your local department of sanitation for details.
Away from home? Use an old test strip bottle or empty prescription bottle to hold your used sharps until you get home and can dispose of them safely.